Editing Active Equipment
You can edit parameters of previously added equipment on the corresponding active equipment's page. The page has the following tabs:
-
General — a summary on active equipment.
-
Components — allows viewing and editing equipment components.
-
Bindings — here you can view and edit existing bindings of equipment and its components, and add new ones.
-
Events queue — here you can view the events queue by applying an adjustable filter.
To delete equipment, click Delete at the bottom of the page.
General
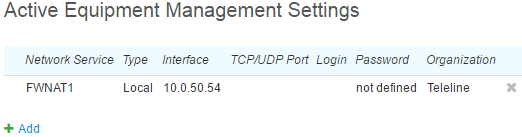
The General tab shows the same parameters you entered while creating the corresponding equipment. Additionally, in the Active equipment management settings section you can enter details for managing equipment by filling in the necessary boxes:
-
Network service — specify the active equipment manager responsible for processing events.
-
Type — define the protocol for event-related commands to be executed.
-
Interface — an IP address to access equipment management from the list of IP addresses previously assigned to either this equipment or its components.
-
TCP/UDP port — a port to access equipment management.
-
Division — a service provider that have access to equipment management.
When necessary, specify a login and set a password.
You can also use this section to store active equipment parameters while leaving Network service unfilled.
The tab also shows custom fields previously set up on the page of the corresponding entry in the product catalog.

You can bind addresses of different types (street addresses, subnets, IP addresses, etc.) to equipment. Available types and kids of addresses are defined in the Addresses section of the product catalog entry on the basis of which this equipment is created.
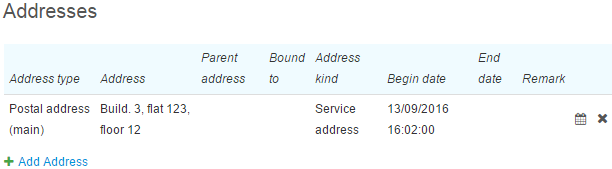
Street service address specified for CPE allows to choose provider equipment situated at the same address when creating bindings. Also, a service address is used while defining addresses available for binding, if there are some addresses of the Resource pool kind bound to the corresponding real estate object.
Any address binding to equipment has a period of validity defined by Begin date and End date. By default Begin date is populated with the date an address is added to the equipment, and End date remains empty.
When an address stop being used by equipment you just need to enter its End date by clicking  in the corresponding row. Unlike deleting bindings, specifying End dates allows storing the addresses usage history.
By default, Hydra allows binding one and the same address to several equipments at once. The only exceptions are IP and IPv6 addresses. They have to be unique at each time for equipment components that are created on the basis of specification items of the Port type within the Active equipment group of the product catalog. This rule is also valid for components created on the basis of specification items of the Port type within the Network services group. However, you can assign one address to both an active equipment component and a network service component at the same time.
To change the uniqueness settings you should contact the tech support.
When adding a VLAN you can enter a MAC address previously bound to the equipment in Parent address. Also, when adding an IP address you can choose one of the previously added VLANs in Bound to. The IP address is to belong to a subnet of the VLAN. Thus you can define the connection: MAC address → VLAN → IP address. In this case, if you specify End date for the VLAN binding the same date is automatically assigned to the IP address. If you specify End date for the MAC address, it will be assigned to both the VLAN and the IP address. Similarly, deleting the VLAN binding leads to deleting the IP address binding, and deleting the MAC address binding — to deleting both the VLAN and the IP address bindings.
With the help of an address of the Resource pool type you can specify address ranges to restrict assigning them to CPE.
If an address binding to equipment is in force and you change the address in it (i.e. you enter a different IP or MAC address) and click Save, then the system will set End date in the previous address binding (one second earlier than the current date) and a new binding with a new address will be created with the current date as Begin date.
In case the previous address was connected to other addresses belonging to the equipment, all dependent addresses are re-bound to the new address. Thus, if you change a VLAN that has an IP address bound to it, there will be a new binding created for this IP address, with a new VLAN in Bound to. The current date is also used as Begin date for this binding. And the previous binding has End date that is one second earlier than the current one.
Components
This tab shows a list of components with their bindings. Here you can use quick search, filter components by statuses, and add new ones. In the example below, the DES1024D-2 switch of the D-Link DES-1024D type can have twenty-four components of the Port 10/100Base-TX type. The Components tab shows nine ports initialized (i.e added).
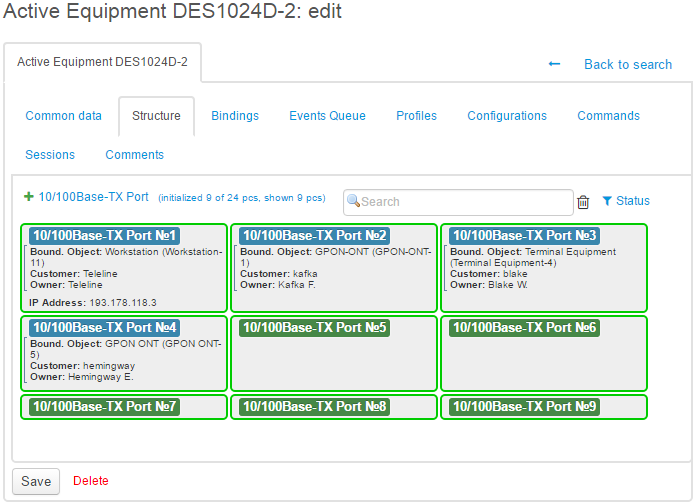
A component heading highlighted in blue means there already is a binding with it, i.e. the component is occupied. Free components have green headings.
You can set the colors of the frame and background in the specification of the corresponding product catalog entry.
To add new components click  , specify their number and click Add. When added, components are numbered using autonumbering.
Click a component to open its page.
When you delete any active equipment all its components are deleted too.
Bindings
On this tab, see direct and reverse bindings of equipment and its components to network services, other equipment, and other components. Typically, bindings are used for processing events at customer equipment.
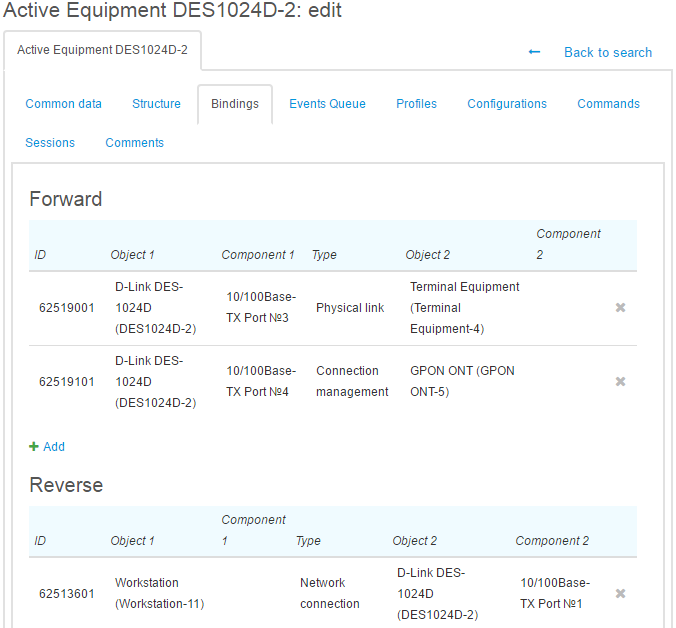
To add a new binding, click Add. Choose its type. Most frequently, types are used in the following ways:
-
Connection management for a binding to a network service (for example, to a program firewall or a shaper).
-
Physical link or Network connection for a binding to a switch (for example, to identify a customer by a switch port).
-
Installed in — for example, to bind a switch to a rack.
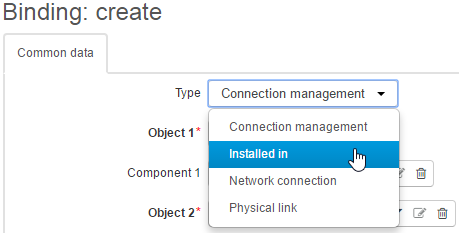
Object 1 is automatically filled with a code of an object which page a direct binding is added from. When it is necessary to bind via a component of an Object 1 you should enter it in Component 1.
Enter Object 2 — an object for the component to be bound to, for example, a network service or a switch port.
Filter  next to Object 2 allows choosing only equipment which service address is the same as the one of the equipment to be bound. Besides, for ease of choosing a binding object, the system also shows the quantity of its available components and object street address, if specified.
Note that an available component in the list of found object is a component added on the Components tab of the corresponding object, it is Active and has no bindings.
Use  to search for any equipment regardless of its service address. Select the registry you want to use (active equipment, passive equipment, or network services).
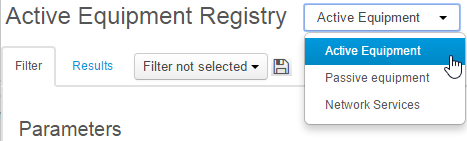
Set up a filter, click Start search, and choose the necessary object among found ones.
If necessary, choose Component 2 (for example, when adding a binding to the port of the equipment specified in Object 2). Click to view a list of components of the object together with the number of bindings and statuses of each component. Choose the needed component and click Add.
Reverse bindings are different from direct ones in the fact that current equipment or an equipment component is shown as the object of the binding (Object 2). For example, if for a customer equipment component there is a direct binding created to a switch port, then on the pages of the switch and the switch port this binding is shown as a reverse one.
It is easier to create bindings for customer equipment components particularly on the CPE page.
To delete a binding, click  in the corresponding row.
Events Queue
On this tab, you can view an active equipment events history.
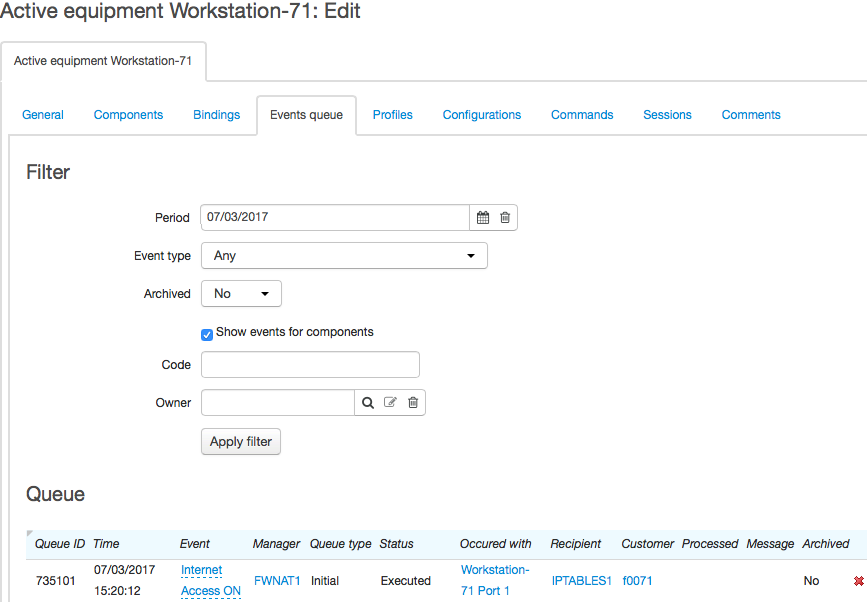
The Show events for components check box allows viewing events history for equipment components. When it is selected, you can narrow down the search results by a component code or by its owner.